Alignments for the Individual Wearer

Everyone’s face is different. So every frame must be adjusted in several ways to match the individual wearer. Most people have ears which are asymmetrically placed, one higher and one lower and closer to the front or to the back of the head. And of course, all of our noses are shaped differently.
This facial asymmetry will become painfully apparent when you view my full size images below. There is a reason I’m an optician and not a stand-in for Patrick Dempsey.
Since you have already placed the frame in standard alignment, you can start making adjustments so the frame will fit an individual.
The most common individual adjustments are:
Bending the temple ends
Moving the nose pads
Getting the frame to sit evenly on a person’s head
Less frequent adjustments are:
Resolving tilt issues
Moving vertex depth
Try very hard to never allow customers to just “pick up” their glasses.
Never allow customers to try on a new pair without an optician sitting across from them.
Customer’s negative reactions to a new pair of glasses can be overcome if addressed immediately. Bad moods are contagious. An unhappy customer complaining aloud to a friend or family member may create a negative atmosphere in the store. It is best to allow the customer to try on the new pair for a moment, inquire about their vision through them, and then perform adjustments.
This has always been a bit of a pet peeve of mine because I feel it is quite important. Remember in a state that requires an optician to have a license it is (technically) only a licensed optician who should be handing glasses to a customer. Be sure that your co-workers are aware that glasses are not to just be handed to the customer by anyone else in the store.
Temple Bends
The bend should begin immediately after it passes over the top of the ear. It should be rounded and smooth, and should hug the ear to just past mid-point then angle away. The very end of the temple should turn in slightly to hug the skull. A temple-bend that begins before the ear may be thought of as “early.” A bend which begins past the ear may be thought of as “late.” Early bends actually push the glasses off the wearer’s ears and nose, and late bends allow them to slide off the ear and the nose.


1) The bend.
2) Where the bend should have been placed.
3) This early bends pushes the glasses down the wearers nose.

1) Where the bend should have been placed.
2) The bend.
3) This late bend will allow the glasses to slide down the wearers nose and fall off.
4) The mastoid bump.

1) Nice smooth bend that start right at the top of the ear.
2) The temple tip sits on the bony bump or the mastoid.
Experience is the best teacher on just how much or how little to move a bend. On a new frame, it is often possible to make temple-bend adjustments without heating the temple end at all. It is always possible to do this on a metal frame, but you may have a smoother bend in the plastic temple end sleeve if you heat it first (metal frames never require heat to adjust).
Some plastic frames with very thick temple arms may require a great deal of heat to bend. It is usually best to fully straighten out the temple end before creating the new bend, rather than trying to bend from where it is. Use your thumb and fingers to create a new bend that is smooth and flowing, not sharp and angled.
Nose Pad adjustments
All frames with nose-pads will need to be checked for position. The pad needs to be positioned so it will come in contact with the greatest area possible on the customer’s nose. In some cases, you may have to lay the pads almost flat against the lens to achieve fit. Again, just go for maximum pad-to-nose contact!
You will also use nose-pads to lower or raise the frame. If you spread the nose-pads out, the frame will come down the nose. If you move them closer together, you will force the frame up. This will allow you to alter the cosmetic look of the frame in relationship to the wearer’s eyebrows. Adjusting the nose-pads is also an important adjustment when fine-tuning the fit for a progressive lens.

In this figure notice the position of the nose pad, the bridge, and the bifocal height.

In this figure I have pushed the pads in closer together by less than a millimeter. However notice that the bridge has come up and that my bifocal segment height is now higher.
A multi-focal or progressive fit a little high can often be corrected with this minor adjustment.
Leveling a frame
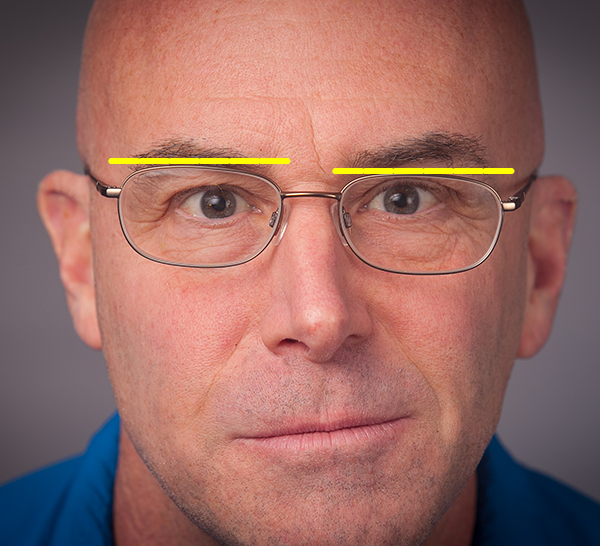
The last routine individual adjustment is getting the frame to sit level on the wearer’s face. Although it is not a good idea to point it out to people, almost all of us are very asymmetrical. That is, we all have ears, eyes, and noses that are not perfectly even on our heads. Most people have one ear slightly higher than the other, which causes the glasses frame to sit crooked on their head.
To achieve a level frame, first choose a reference point. I use the eyebrows, others use the eyeball. Then, choose the side you wish to lower or raise (keeping in mind the height of a lined multifocal or progressive). For example, if the customer’s frame is sitting much lower on their right, and the left looks correct, I would move the right side.
To move a frame that is not level, simply angle the temple (as it leaves the chassis) up or down as needed. If I push the right temple down, the right side of the frame front will move up. The pressure exerted on the top of the ear where the temple hits will push the frame front up. This may require a bend of several millimeters. My own ears require that my right temple be set almost a centimeter higher than my left to achieve a level frame front, but please do not tell anyone.


Using your fingers or the wide jaw pliers “twist” the temple in the direction opposite of what you need the frame to do. If I angle the temple down (create more force where the temple meets the top of the ear) the frame will go up. Which temple you choose to move in what direction is a matter of practice and experience.

In this image the frame is in standard alignment and would pass the temple parallel test. Using the eyebrows as a guide the frame sits much higher on my right side, and much lower on the left.

By adjusting the temples as shown above I now have a frame sitting level on my face.
Secondary Individual Adjustments

Secondary individual adjustments may include vertex depth issues. This is a fancy way of saying, “My eyelashes are hitting the back of the lens.” To pull a frame away from the wearer’s eye, first reduce the temple bend very slightly and see if it helps. If changing the temple bend slightly does not help, and the frame has nose-pads, then pull the nose-pads back from the eyewires towards the wearer’s face. This will push the frame front out away from their eye. On plastic frames and on some metals, you may also try adding a little more or less positive face form.
Tilt Issues
The last common individual adjustment is addressing tilt issues. Should a customer complain of the lens or eyewire touching their cheek, adjust the temple as you do in standard alignment. To move the lens or eyewire away from the cheek, angle the temples up as needed. However, never angle the temple to the point where you have retroscopic tilt.
Adjusting Glasses That Have Been Sat On, Stepped On, Run Over By A Car, Eaten by the Dog, Put Through a Blender…
The third types of adjustments are those done to older pairs of glasses that have been bent out of shape. These adjustments are actually just a combination of standard alignment and individual alignment, and will often include repairs. People routinely sit on their glasses, step on them, and have children pull them off their faces. Dogs chew on them. Their glasses are knocked off their faces. These adjustments also include the popular “I just need my glasses tightened” visit.
Frames can take a huge number of adjustments before breaking. I have adjusted frames that I was sure were going to break, that did not. I have also performed routine adjustments on frames that looked just fine and had them break. Frames are like paper clips: they will bend just so many times before they break. There is no way to tell when that is going to happen, so a certain amount of frame resilience during adjustment is just plain luck.
There are some things you can do to protect yourself from the inevitable break. First, be sure your store has its policy on adjustments posted. An example is, “We will be happy to adjust frames not purchased here. However, should your frame break during the adjustment, we will not be responsible.” If the frame was purchased through your store, you will have access to warranty information and can check new frame availability.
OK Pet Peeve of mine… Please don’t make people sign some kind of “release form” or “waiver” to adjust their glasses or reuse their frame. I could go on for an hour here but — the 1 in 5000 chance that a frame will break during adjustment or while it is at the lab isn’t worth the loss of confidence that customer will have. Talk about it sure. Have a sign up sure. But don’t get carried away.
Worse case scenario you eat the cost of a new frame and lenses. Once, twice maybe a three times in a lifetime thing…
You will earn that back ten-fold by winning a new customer by doing a great adjustment on that old frame of theirs.
OK, OK with that said – don’t be a patsy either. An honest routine breakage on an ordinary frame and set of lenses is one thing. Being asked to adjust some crazy high-end antique or something is another. CYA where appropriate.
Your working relationship with the customer will give you a foundation for discussing possible frame breakage during adjustment.
Be sure to tell people BEFORE you begin to make any adjustments if you feel the frame is suspect. Tell the person, “I rarely say this, but this frame looks like it has been bent badly before. I am afraid that it is going to break when I adjust it. I am happy to bend it back, but if it breaks I will not be responsible.” Rehearse it, say it, do it!
Perhaps the most important way to avoid breakage is using the right tool for the job. Using the wrong tool will not allow you the “feel” necessary to avoid breakage and damage.
When performing routine adjustments, following the standard alignment steps corrects problems about 90% of the time. You will rarely need to make individual adjustments in addition to standard alignment. Pay close attention to nose-pads which may have been jammed forward, and may actually be hitting the lens edge or eyewire. Use your fingers or needle-nose pliers to pull the pads back out, and replace torn or worn nose-pads in matched pairs.

